Step 1 – Preparing the ground and site for pouring concrete
Preparation is key to successfully laying concrete. Make sure your site ticks all the boxes for being clear of debris and being on level ground. And of course keep pets and children out of the way!
Remove any stones or gravel from the area where you’ll be laying concrete and also remove a layer of topsoil. The reason for removing topsoil is that it is organic in nature and you want to avoid any shifting of the space where you’re pouring your concrete.
Clear away any weeds and be sure to remove tree / plant roots, as this will make the ground more stable and less likely to cause issues further down the line.
Step 2 – Once the area is cleared of debris and weeds etc. further preparation of the surface is needed
Cover the surface with hardcore (made up of materials such as construction waste, for example, tiles, quarry waste, other crushed rock and gravel).
Compact this by using a roller, or a compactor (a tool which ‘hammers the ground down and until it’s tightly packed together and as flat as possible).
Cover with a fine layer of sand and some damp proof membrane sheeting (DPM), to prevent moisture escaping from the concrete – and to negate any damp issues when concreting floors.
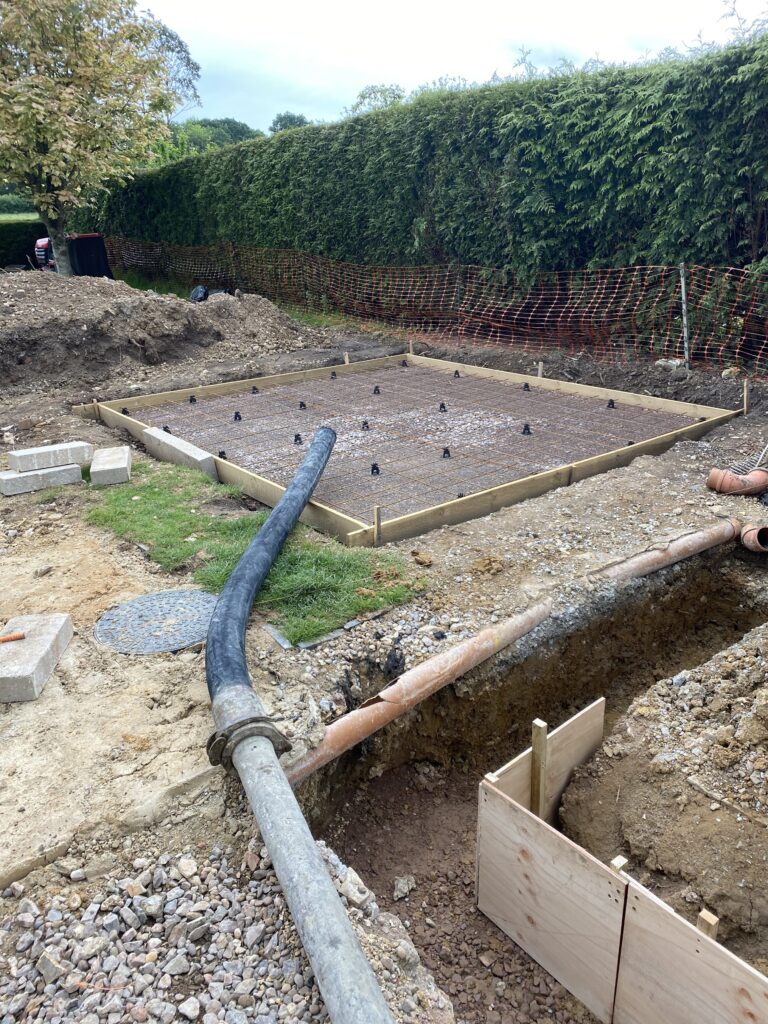
Step 3 – Measure out your base, create your formwork, create a ‘fall’
Use our handy concrete mix calculator to work out how much concrete you will need for your project. If you have any questions, simply call our friendly team for support, on 01273 594394.
Make sure to allow around 80mm of extra space around the size of your finished slab base. This is to allow room for formwork (a temporary mould for your concrete to sit in to ensure it doesn’t flow wherever it likes!) In general, you’ll use timber for this, but sometimes other materials are used, such as steel or even reinforced plastic.
You’ll also need to ensure that your formwork is at perfect 90 degree angles to get the results you want and set up a solid foundation for your project.
This video gives great pointers on formwork, slopes and considerations for angles and measurements:
When to remove formwork from concrete?
Once the concrete has gained sufficient strength (hardened sufficiently), the formwork can be removed. This is dependent on many factors, including grade of concrete, temperature, size of concrete area etc.
Step 4 – Order and delivery of concrete from McHugh
Ordering couldn’t be simpler. Just work out the amount you need using our handy online calculator as mentioned above, or contact our friendly team who can advise.
Ideally, you’ll want to avoid a rainy day, so check the forecast. We offer free cancellations if they are made before 3pm on the day prior to delivery
Make sure you have enough people on site to help you lay the concrete. Generally, you’ll want to get it laid within 1 hour of delivery. Time is of the essence and concrete will become less workable, quicker, on sunny days / days with higher temperatures.
Make sure you have necessary tools on site and the area prepped (as detailed above) beforehand. You’ll want shovels and wheelbarrows, a rake for levelling, alongside a tamping beam for slab work (to level out the concrete by dragging it forward and back in a sawing motion and along the top edge of the concrete to make it perfectly flat and even).
Access:
Making sure we have good access to the site is one of the key factors for everything running like clockwork. Here’s a few considerations for access on the day. Whatever your requirements, the team at McHugh Concrete will be happy to discuss your needs and to organise a site survey to advise on the best option for you, so don’t delay!
- Is there clear access to park on the highway in front of your property?
- How will you get the concrete to your work area; directly from chute, wheelbarrow or pumped?
- Are there any over-head or below-ground structures?
- Do you need our truck to go off the highway? If so, is the ground safe to do so? (Vehicle is 38 Tonnes fully laden.)
Step 5 – Curing your concrete and finishing the job off nicely – Finishing and curing
Finishing:
It is important to properly finish the concrete surface to protect against wear and tear and avoid any water ingress etc / cracking, as much as possible.
Finishes vary depending on your project and desired aesthetic.
For most DIY projects e.g. slabs, paths and drives – a tamped surface works well for a rough finish that will reduce the chance of people slipping when walking.
A tamped finish is created by raising and lowering the compacting beam in its final pass to produce a surface with ridges.
Here’s a video showing the tamping process:
Other options include the perhaps more aesthetically pleasing, brush / broom finishes, where a brush is passed over the drying concrete to leave a textured look, that’s also great for walkways and medium to high traffic areas. This can also provide additional grip for wheels of vehicles etc.
Here’s a great video on brush finish concrete:
Curing:
Curing is vital as it improves the strength and lifespan of the concrete you’re laying. In order to harden properly, your concrete needs some moisture and to ‘cure’ at the appropriate temperature. This needs to be the case for approximately seven days after you’ve laid your concrete.
To do so, you can use a membrane known as a curing compound to seal in moisture. You simply spray this on the surface of your slab after you’ve completed the finishing process, to keep it moist enough to harden effectively (cure).
While you can get quick drying concrete etc., you should exercise caution, as it’s the curing process that takes place over several days that makes sure your concrete is fit for purpose for years to come.
For any additional advice you may want or to order your ready mix concrete, simply get in touch with our friendly team today.